Introduction
Hello everyone, and welcome back to this brand-new video.
Is the stop loss value we’ve chosen too wide? Does using a take profit or a breakeven improve our strategy?
One of the coaches at Unger Academy here, and today we’re going to be looking at how we can answer these questions using two perhaps little-known metrics.
I’m talking about the MAE and the MFE metrics. So we’re going to be discussing them in depth to understand how we can use them to improve our exits.
What are MAE e MFE and why is it important to know them?
Okay, so let’s first try understanding what MAE and MFE are. So let’s start with MAE, the Maximum Adverse Excursion.
Let’s take one of our trades, with its entry and exit price, and give the lowest value recorded by the market.
Here, the MAE quantifies the maximum drawdown of our trade numerically.
Let’s take its "sibling", the MFE, which is the Maximum Favorable Excursion.
Let’s take the trade that we have just seen, and see the highest value reached by the market. The MFE simply quantifies the maximum profit that the trade made before it ended.
Now, if we understand correctly what these two values represent, it’s clear that stop loss and take profit can be seen as borderline cases.
What I mean by that is that the monetary value of the stop loss coincides with the MAE of the trade closed by the stop.
Similarly, the monetary value of the take profit coincides with the MFE of the trade closed in the target.
But why is it helpful to know how to use these metrics? Well, in a nutshell, we can say that if we were to extend this analysis to all the trades made by our strategy, we could better understand whether our stop loss, take profit, or break-even orders are placed at the right level.
In addition, the high values of these two metrics should also lead us to understand the reasons behind them and potentially adjust our exit levels.
MAE and MFE in MultiCharts
We’ll see a practical example in a moment to better understand how we can do this.
But first, let’s move to our MultiCharts platform and take a look at where these metrics are displayed and at how we can read them in an easy way.
This is the chart of Crude Oil. We are using a 15-minute timeframe, and we have applied a strategy to it, a strategy that we’ll need for our tests shortly.
In our report, under Trade Analysis, we can see that we have percentage metrics. We’ll ignore those and just focus on the absolute metrics.
We notice that we have two separate charts, one for each metric, and these charts are scatter plots.
But how do we read these charts? First of all, we can see that there are green and red dots in both charts.
These green and red dots represent, respectively, the Profit and Loss trades of our strategy.
In the case of the MAE, we find on the Y-axis the Profit and Loss of our trades, and on the X-axis, the maximum drawdown achieved.
In the case of the MFE, we find on the Y-axis the Profit and Loss of our trades, while on the X-axis, we find the maximum run-up.
Let’s just take some points as an example. This one had a maximum drawdown of about $1,000, then closed with a profit of about $1,700.
With the MFE, the reading is similar, but the parameter changes.
Here’s an example: the price went up about $3,500, then went down and closed at about $1,200.
Example strategy
Let’s take our example strategy.
Let’s look at what our inputs are. The Stop loss is $1,400, the Take profit is $4,000, and we have no Break-even.
Let’s keep these values in mind, and then we’ll need them.
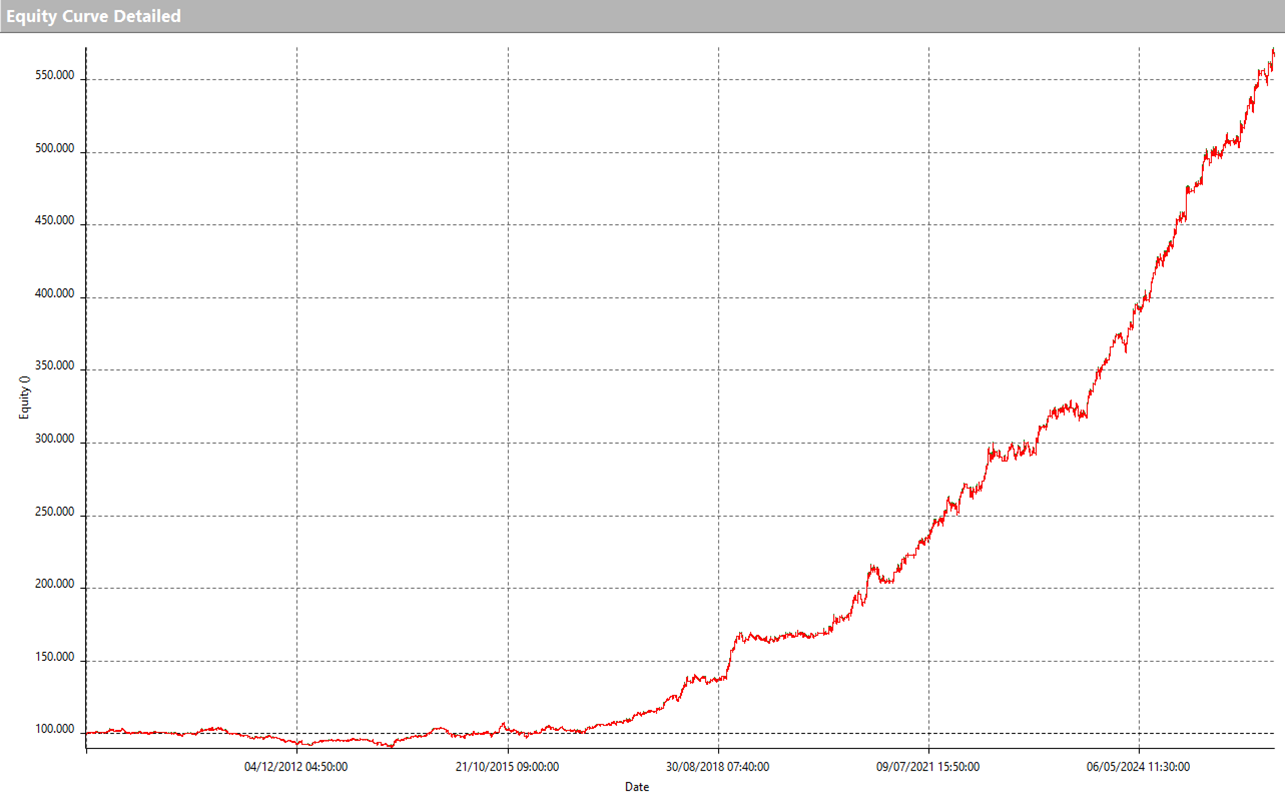
Let’s also look at the metrics of the strategy. It generates $247,000 with a maximum loss of $18,000.
The average trade is $210, making about 1200 trades balanced between long and short.
This is the current equity.
See where you can find stop loss and take profit on our charts.
We’re on the MFE chart and find the stops are aligned at the $1,400 level.
They are more concentrated here on the left side, which is natural.
If we think about it, they reached limited run-ups before they closed on stops.
We also find some unpleasant trades for the trader. These have achieved substantial run-ups before they closed on stops.
We find a positive outlier here in the upper right-hand corner and three to four negative outliers that, for various reasons, have exceeded the value set by our stop.
Finally, behind this point, all the targets in our strategy are at $4,000.
If we switch to the MAE chart, we also find all of the strategy’s profit targets are aligned at a value of $4,000.
Again, we notice the positive outlier here at the top and the negative outliers here on the right.
Where’s the stop loss? They are all here below the $1,400 level.
How to use MAE to estimate stoploss values properly
Alright, guys, but now that we know how to read these metrics, what can we do with them? How can we use them to help us make better trading decisions and improve our strategies?
Let’s go and resume our strategy for Crude Oil. We know we have a stop at $1,400.
This is a final value because it was optimized a few years ago.
However, we intentionally change the stop loss by setting a much larger value, three times as much, say, $4,200.
We do this to see if, for example, the MAE analysis tells us that we’re somehow exaggerating.
Here’s our chart. It’s immediately noticeable that we have a lot of losing trades to the right of this value, around $1,500.
And so, we can tell right away that something’s wrong.
Let’s take a look at the numerical metrics of the system.
Net profit has dropped to $212,000, and the maximum drawdown has risen sharply to over $40,000.
The average trade has also been negatively affected by our trade, and equity is certainly not what it was before.
But if we go back to our MAE chart, we could say that limiting trades to the right of a specific value, let’s say, with a drawdown of around $1,500, would benefit our system.
This means that the graphical analysis already told us at a glance that we should have reduced the value of our stop loss.
Then, to calculate the optimal and stable value of the stop, the numerical optimization of MultiCharts will undoubtedly help us.
How to use MFE to estimate takeprofit values properly
Now when does the MFE come into play? Remember that the original strategy had a target of $4,000.
I’ve purposely set it here at the double value of $8,000 to see if our chart indicates anything.
We can see that to the right of the run-up value of $4,000, we do have trades that closed at a higher profit, but we also have trades that declined by about the same amount and closed at a gain of less than $4,000.
Let’s take a look at whether the numerical metrics of our system confirm what we’ve said.
We can see that the net profit has remained more or less the same.
The maximum drawdown has also deteriorated a little bit.
The average trade is at the initial value.
Equity isn’t very different from the original.
So, the metrics confirm that there hasn’t been much improvement, maybe even a slight deterioration.
And actually, the MFE chart also shows us that setting a too-tight take profit would jeopardize promising trades forcing them to close at a value that is definitely too low.
We understand this by looking at the number of profitable trades to the right of the maximum run-up of $2,000.
Almost all the winning trades were made with a gain of more than $2,000.
So, setting a take profit around the $2,000 mark would mean that we would leave all of those additional profits on the plate, and that’s certainly not something that we would be happy with.
So, I set a profit target of $2,000.
Let’s now see if the numerical metrics of the system confirm what we suspected.
We find that the Net profit has dropped to $175,000.
The maximum drawdown has remained about the same as before.
However, the average trade has dropped to a value of $141.
This confirms that setting a take profit too tightly brought about a significant deterioration in the system.
How to use MFE to estimate breakeven values properly
Another way to use the MFE is to check at a glance the potential effectiveness of adding a break-even exit to our strategy.
The breakeven value must be set between the value of zero and the value of our strategy’s target.
However, we can see that there are only a few losing trades to the right of this range. So, we don’t expect to get any significant changes by introducing a breakeven stop.
Let’s take a look at the optimization on MultiCharts to confirm what we said.
We find that adding a breakeven at any value doesn’t change the metrics, the net profit, the average trade, or even the maximum drawdown.
As is often the case, introducing a break-even doesn’t change the system’s results much. Still, it can be psychologically helpful because it limits retracements, making a strategy more tolerable.
Final thoughts
Well, guys, we’ve seen the MAE and the MFE metrics, how we can read them in a simple and straightforward way, and how we can use them to decide on the exits values that we use in our strategies.
If there is anyone among you who is interested in the world of systematic trading, I recommend that you go and click on the link in the description of this video.
From there, you can watch a video of Andrea Unger, or you can get our best-selling book by just covering the shipping costs,
or even book a free call with a member of our team.
If you enjoyed this video, please leave us a Like, subscribe to our channel and go and click on that notification bell, you know, that one, so you can stay updated on the release of all our new content.
We thank you so much for your time and attention, and we look forward to seeing you again soon. Bye bye!